Cake and Cupcakes

Banana Streusel Coffee Cake

So last week, I went for my very first MRI.

Banana Streusel Cake

Not very exciting you say.  Ok well you might be right.

I mean, it mainly was a lot of waiting, and lying very still.

I had to fill out this questionnaire about myself, before they stuck me in the tube, mostly querying me about the amount of metal in my body, before they stuck me inside a giant electromagnet. Fortunately, metal is something that I do not have much of in my body.  However, one question they seemed to really stick on was a tattoo. I’ve had a small one on my back since my twentieth birthday, something I’ve never regretted until that very moment. I mean it’s not like it’s a piercing that I would be able to take out then put back in. It’s been permanently injected into my skin.

So when the technician calls me in and is explaining the whole process to me, I am positively wracked with anxiety, imagining little particles of iron, being ripped out of my body in the exact size and shape of my tattoo.

And then she says nothing. Asks me three times if I have a pacemaker ( geez, I’m 26!), but says absolutely nothing about my tattoo.

Banana Strusel Coffee Cake

All that build up for nothing.

And then she sticks me in a tube, face down, my left arm above my head, and my right knee hiked up.  And I have to sit still. For half an hour. Something that I can’t do on the best of days.

So I occupied my time, by letting my mind wander, not concentrating on how I need to keep still, and distinctly focusing on my back, facing towards the large magnet, all my senses tuned in to the slightest inkling of pain.

I can officially report back that my back made it out safe and sound.

Also, if you are curious, this is what else I pondered while stuck in the tube:

– I totally understand why people freak out about these things. It was a tight squeeze in there. Although I did find the lighting in there rather soothing. Very much like the doctor shows you watch on TV.

– The loud beeping noise that the machine made, I think is roughly an E. But I could be wrong. I’m not known for my musical ear.

– I wondered that if I was inside a giant magnet, why my IV didn’t fly out of my arm. Until I noticed when she pulled it out that the sharp wasn’t metallic.  Also, I really hate IVs.

Banana Coffee Cake

Afterwards, on the way home, we stopped at a small locally-owned gas station to grab some drinks. I walked in with my arm taped up and the hospital band around my wrist. On the way out, I leaned over to Mr Ginge, and told him that the cashier is probably at this moment, writing my license plate number now, and listening intently to the radio and TV, to hear about any random psych ward escapees in the area.

He told me to stop watching so many movies.

Banana Streusel Coffee Cake

makes 1 cake

For the cake:

  • 2 cups flour
  • 1/2 tsp baking soda
  • 1/2 tsp baking powder
  • 1/2 cup butter, softened
  • 1 1/4 cups sugar, divided
  • 2 eggs
  • 1 cup mashed banana
  • 1/2 cup sour cream
  • 1 Tbsp cinnamon

For the streusel topping:

  • 1/4 cup butter, softened
  • 1/4 cup sugar
  • 1/4 cup flour
  • 1/4 cup oats
  • 1 tsp cinnamon
  1. Preheat the oven to 350°F. Grease and flour a loaf pan.
  2. In a bowl, mix together the flour, baking soda, and baking powder.
  3. In another bowl, cream together the butter and 1 cup of sugar until light and fluffy. Beat in the eggs one at a time, beating until slightly thickened.
  4. In a small bowl, mix together the banana and the sour cream. Add the flour mixture to the butter mixture, alternating with the banana mixture, until smooth and combined.
  5. Mix together the remaining sugar and the cinnamon. Spread 1/3 of the cake batter into the bottom of the prepared pan. Sprinkle half of the cinnamon sugar mixture over it. Repeat with another layer of batter and cinnamon sugar, then top with the remaining batter.
  6. Work together the ingredients for the streusel topping with your fingers until it is combined and is slightly crumbly. crumble over the top of the batter.
  7. Bake in the preheat oven for 45-50 minutes, or until a toothpick comes out clean.
  8. Let cool for 10 minutes in the pan, then remove from the pan to a wire rack to cool completely. Slice and serve.

Apparently, I can let my imagine run wild sometimes…..

-Mel


I linked this post to The Weekend Potluck. Check out more great recipes there!

Categories: Cake and Cupcakes | Tags: , | 1 Comment

Little Cakes with the Crunchy Ball Bearings

Seriously, time flies.

tea cakes

Honestly, it just seems like a moment ago it was the beginning of May.

And now guess what?

There is six months left till the 50th anniversary episode of Doctor Who!!! Yay!!

Although, after what happened last episode, I’m not ready to talk about it. I’ll talk about food instead.

Tea cakes with ball bearings

One of the most memorable “food moments” for me was in the episode ” Fear Her”. Right as Ten and Rose are walking into the neighbourhood, he starts babbling about a tea party and his preference for these little teacakes with the “crunchy ball bearings”,  and then at the very end, after they save the day, she hands him a little tea cake just like he described.

In the context of the show, it has absolutely nothing of importance to it, but like all food it stuck with me. Especially since it was sweets.

DW tea cakes

Little Cakes with the Crunchy Ball Bearings

Makes 8 cupcakes

  • 1/4 cup butter, softened
  • 1/2 cup sugar
  • 1 egg
  • 2 Tbsp mandarin juice
  • zest from one mandarin
  • 3/4 cup flour
  • 1 tsp baking powder
  • 1/4 cup evaporated milk
  • 1/2 cup powdered sugar
  • 1 Tbsp mandarin juice
  • silver dragées
  1. Preheat the oven to 350°F. Line your cupcake pan with 8 liners.
  2. In a large bowl, beat together the butter and sugar until it is light and fluffy. Beat in the egg until smooth and combined. Add the zest and the mandarin juice.
  3. Sift together the flour and the baking powder. Add it to the egg mixture in 3 parts, alternating with the milk.
  4. Split the batter between the eight liners. Bake in the preheated oven for 15-17 minutes, or until a toothpick comes out clean.  Let cool in the pan for 10 minutes, then remove  from the pan and cool completely on a wire rack.
  5. Meanwhile, mix together the powdered sugar and the 1  tbsp of mandarin juice.  Once the cupcakes are cooled, spread the glaze over top then sprinkle with the dragées, then let the icing set.

” I can’t stress this enough: Ball bearings you can eat. Masterpiece!”

Categories: Cake and Cupcakes | Tags: , , , | 2 Comments

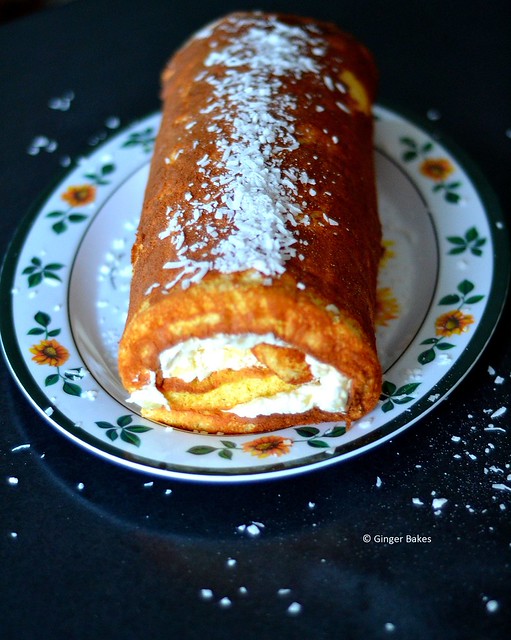
Pina Colada Cake Roll

Ok. I think it’s time for another episode of “Mel-is-embarrassing-and-can’t-be-taken-anywhere”

Pina Colada Cake

Tim Horton’s edition.

My sister recently upgraded her phone, so I have adopted her old beater of a phone.  Now this phone is an all touch screen phone, which meant a whole new learning curve for me, when I only had just recently adopted a phone with a keyboard. Many frustrations have ensued.

Pina Colada Cake Slice

Anyway, while waiting in line at the coffee shop, I was texting someone, and I was making a mess of it. Button mash galore.  So I got frustrated. And yelled at my phone. In the busy line. In the general direction of an unsuspecting man, who thought my cries of frustration were directed at him.

Oh yes.  By all appearances, I yelled at a complete stranger.

Oh and did I  mention that a co-worker was in the line as well and saw all this go down.

Needless to say, I needed cake after work.

Pina Colada Cake Roll

Pina Colada Cake Roll

serves 8-10

For the cake:

  • 4 eggs, separated
  • 3/4 cups sugar, divided
  • 2 Tbsp coconut rum or  rum extract
  • 1 Tbsp canola oil
  • 2/3 cup flour, sifted
  • 1 cup shredded coconut

For the filling:

  • 1/4 cup flour
  • 1 cup milk
  • 1 cup butter, softened
  • 2 cups icing sugar
  • 1 can crushed pineapple, drained

For the Cake:

  1.  Preheat the oven to 350°F. Grease and line a 15 x 10 jelly roll pan with parchment paper, then grease the parchment paper. Set ‘er aside.
  2. In a large bowl, beat the eggs yolks until doubled in volume and lemony coloured. Gradually beat in 1/4 cup of sugar. Stir in the oil and the rum.  Set it aside
  3. In another large bowl, whip the egg whites until you get soft peaks. Gradually add the remaining sugar, a tablespoon at a time, until you get stiff and glossy peaks. Gently fold the egg whites into the egg yolk mixture.
  4. Add the flour and the coconut to the egg mixture and gently fold until just combined.  Spread the batter gently into the pan. Bake in the preheated of for 10-12 minutes or until the cake springs back when you touch it lightly.
  5. While the cake is still warm, cover it with a tea towel dusted with icing sugar, then loosely roll it up starting from a short side. Move it to a cooling rack, and let it cool completely in the tea towel.

For the Filling:

  1. In a small saucepan, combined the flour and 1/4 cup of milk, whisking until smooth. Cook over gentle heat, until thickened, slowly adding the remaining milk. You want this mixture to be as thick as pudding, and expect it to thicken up some more as it cools. Remove from heat and let cool completely. 
  2. Meanwhile, beat together the butter and the icing sugar until light and fluffy. Beat in the cooled milk mixture and the crushed pineapple.

To Fill the Cake:

  1. Gently unroll the cooled cake, peeling off the parchment paper and tea towel. Spread the filling evenly over the cake, leaving  about an inch at each end. Roll the cake back up and set seam side down onto a serving plate.
  2. Sprinkle the top with some extra shredded coconut, then slice and serve.

I like cake. Cake is good.

-Mel

Categories: Cake and Cupcakes | Tags: , , , , | 5 Comments

Lemon Cranberry Pound Cake

So I have a hot tip for you today.

cranberry pound cake - GB

Don’t crack your eggs directly into the bowl.

Now I realize that this may not be any sort of revelation to anyone, but I certainly learned it the hard way the other night.

Do not crack your eggs right into your mixer bowl. Especially if your mixer is on. Because you very quickly go from picking a few eggs shells out of the batter, to a million evil little shards of shell mixed thoroughly in. And are you left staring into the bowl contemplating whether or not it’s worth trying to pick out all the little bits of egg shell so you don’t waste the half pound of butter in there, or sadly dumping it into the trash can.

cranberry lemon pound cake - GB

I’ll save you some time and effort. Just dump it and start again. You’ll drive yourself crazy trying to dig the blasted bits out.

I rock at this baking thing.

Fortunately, this pound cake is egg shell free. Also delicious.  Loaded with tart cranberries and topped off with a lemon glaze, it’s the perfect end to a meal or wonderful along side your coffee in the morning.

lemon cranberry cake - GB

Lemon Cranberry Pound Cake

makes 2 9×3 cakes

  • 1/2 cup milk 
  • 6 eggs
  • 3 1/2 cups flours
  • 2 tsp baking powder
  • 1 tsp salt
  • 1 1/2 cups sugar
  • 1 1/2 cups butter, cut in to cubes and softened
  • 2 tbsp lemon juice
  • 2 tsp lemon zest
  • 1 cup cranberries
  • 2 cups icing sugar
  • 3-4 tbsp of lemon juice
  1. Preheat you oven to 350°F. Grease and flour 2 9×3 loaf pans.
  2. In a medium bowl, whisk together the milk and the eggs. Set aside. 
  3. In a large bowl, sift together the flour, sugar, salt, and baking powder. Slowly beat in the butter, continuing to mix until it is fully incorporated.
  4. Once mixed, pour in half of the milk mixture, mixing well. Scrape down the sides, then mix in the remaining half of the milk mixture. Scrape down the sides again then fold in the lemon juice, lemon zest, and cranberries.
  5. Pour into the prepared pans and bake for 50 to 60 minutes, or until a toothpick comes  out clean. Cool for 10 minutes in the pan, then move to a wire rack to cool completely.
  6. Meanwhile, in a small bowl, whisk together the lemon juice and icing sugar to a pouring consistency ( not too thin or it will pour right off the cake) Pour over the cooled cakes and let set, about an hour.

One day I will grasp basic baking skills.

-Mel

————————————

I linked this recipe to The Weekend Potluck and Strut Your Stuff Saturdays! Click the links for more great recipes!

Categories: Cake and Cupcakes | Tags: , , | 3 Comments

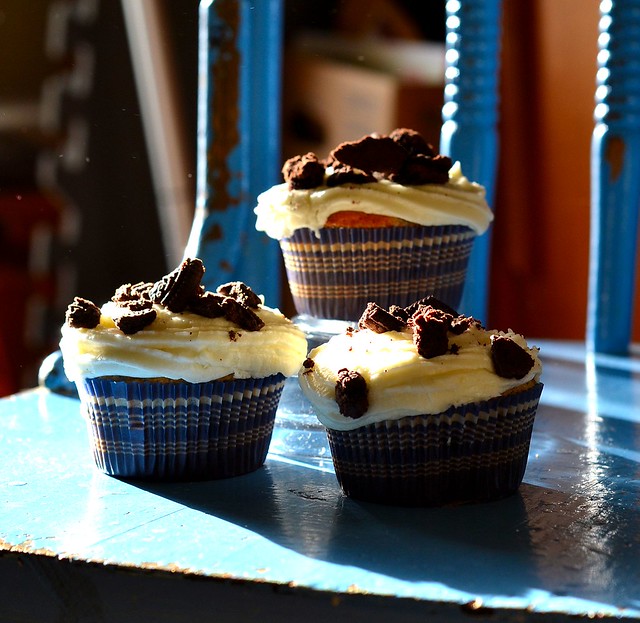
Cookies and Cream Cupcakes

The hardest part I find about blogging is finding something to say.

Cookies and Cream Cupcakes - GB - Copy (2)
Often, I can’t think of anything to say. Like now.  So instead I`ll blather on about what`s been going on Chez Ginge.

  • Both Sash Moustache and Chewy have been dropped off at the vet to get fixed. And they have to stay there for two days after the surgery( which went well, and last time I called they were doing well in recovery).Jack looked at us strangely when we walked in sans cat. In true cat-lady style, I miss them already. I’m so not looking forward to not having my snuggli for another night. 
  • Mr Ginge is a BIG movie fan, and often brings home a couple movies for us to watch. Recently, he’s brought home Rise of the Guardians and Playing for Keeps.  Me, being the absolutely mature woman that I am, loved Rise of the Guardians. If you haven’t seen in, please do. It’s absolutely wonderful, and it’s kind of funny thinking of Hugh Jackman as a fluffy bunny. I absolutely hated Playing for Keeps. I hate stupid characters. Girls that fall for the whore of a main character. Characters that do blatantly stupid things. Random and violent changes of mood or heart. Sadly it’s not limited to movies. I’ve thrown books across the room for the exact same reason.
  • I finally got into a program that will help me get better. I’m anxious and nervous about starting, and in true Melli style have run through situations a million times through my head, but I’m also hopeful about the treatment. While I absolutely love the doctors I have, I’m sick of appointments and going to see them, hahaha.
  • Speaking of Doctors, I have been absolutely hooked on Doctor Who. My sister is in love with the show, and honestly, I was getting sick of not understanding  her jokes and references. So I decided to watch it, despite not really being a sci-fi fan, and generally hating anything to do with aliens. Aaaaaaaand now I’m hooked.  I’m only on season two ( of both Dr Who and Torchwood…..) But I’ve already watched and re-watched soooo many episodes.  I’ve been rocking a Union Jack tee à la Rose circa Empty Child (one of my favourites) thanks to my lovely sister, who has also been rocking the same shirt.
  • Oreos are a bad thing to have in our house. I bought a pack to make these cupcakes  for Mr. Ginges birthday, and we’ve had to hide the bag so that Mr Ginge and I don’t devour them all.

Cookies and cream - GB - Copy (2)
Cookies and cream is one of Mr Ginge’s absolute favourite combination, so these cupcakes were irresistible  I like that they don’t make a super huge batch. Just enough to share, and not have a whole bunch kicking around the house for a while.  Especially when you are already hiding the Oreos.

cookies n cream - GB - Copy
Cookies and Cream Cupcakes

makes 9 cupcakes

For the cake:

  • 1/4 cup butter, softened
  • 1/2 cup sugar
  • 1 egg
  •  1 tsp vanilla
  • 3/4 cup flour
  • 3/4 tsp baking powder
  • pinch of salt
  • 1/4 cup light cream
  • 1/2 cup crushed oreo ( or reasonable facsimile) cookies, plus additional for garnish.
  1. Preheat your oven to 350°F. Line a muffin pan with 9 liners.
  2. In a large bowl, beat together the butter and the sugar, until light and fluffy, scraping down the sides of the bowl a couple times.
  3. Beat in the egg and vanilla until well combined.
  4. In a small bowl, sift together the flour, baking powder and salt. Slowly add it to the wet mixture, alternatively  to the cream. 3 parts dry to 2 parts cream. Beat until combined.
  5. Fold in the crushed oreo cookies.
  6. Divide the batter between the 9 liners, and bake 15-18 minutes in the preheated oven, or until a toothpick comes out clean.
  7. Let cool a couple minutes in the pan, then move to a wire rack and cool completely.

For the frosting: (from French Vanilla Cappuccino Cupcakes) 

  • 1/2 cup milk or light cream
  • 1/8 cup flour
  • 1 tsp vanilla
  • 1/2 cup butter
  • 3/4 cup powdered sugar
  1. In a small saucepan, combine the flour and 1/8th of a cup of milk, whisking until combined. Cook over medium heat until thickened. Slowly pour in the remaining milk, whisking constantly until it has thickened to about the consistency of custard. Set aside and cool to room temperature. 
  2. Meanwhile, beat together the butter and the icing sugar until light and fluffy, about 5 minutes.
  3. Slowly pour in the cooled milk mixture and continue beating until light and fluffy.
  4. Transfer the icing to a piping bag fitted with a wide tip, and pipe onto the cooled cupcakes. Sprinkle with additional cookie crumbs
  5. Store any leftovers in the refrigerator.

Talking about those cookies have made me want them. Ugh.

-Mel

Categories: Cake and Cupcakes | Tags: , , , , | 1 Comment

Layered Honey and Sweet Potato Cheesecakes

I was very tempted to make pie for this month’s challenge.

It’s one of Mr. Ginge’s favourites so I know it would get gobbled up. However, I make it fairly often for him, so it just didn’t seem in the spirit of the challenge.

That is, until I thought of cheesecake. We love cheesecake. And there are almost no cheesecake recipes on my blog.

Smooth, creamy, and lightly spiced, they are perfect for the upcoming holidays.

Layered Honey and Sweet Potato Cheesecakes

makes 12 mini cheesecakes

  • 2 cups crushed Digestive biscuits ( or graham cracker crumbs)
  • 1/4 cup butter, melted
  • 12 oz cream cheese ( 1.5 packages), softened
  • 1/2  cup sugar
  • 2 eggs
  • 1/2 cup mashed sweet potato
  • 1/2 tsp vanilla
  • 1/2 tsp cinnamon
  • pinch of nutmeg
  • 1/4 cup honey
  1. Preheat the oven to 350°F. Line a cupcake pan with liners and set aside.
  2. Combine the digestive biscuits and the butter in a bowl, and mix until combined. Divide between the 12 cups and press into the bottom of the liners.
  3. Beat together the cream cheese and the sugar. Add the eggs one at a time, beating just into smooth.
  4. Divide the batter in half. In one half add the mashed sweet potato, vanilla, cinnamon and nutmeg.  To the other half, stir in the honey.
  5. Pour the sweet potato batter even over the crust, then carefully spoon over the honey batter over top.
  6. Bake in a preheated oven for 20-25 minutes or until the batter is set. Let cool at room temperature for about 30 minutes, then refrigerate for 2-4 hours to chill.
  7. Serve on it’s own or with some whipped cream!

Keely wanted in on some cheesecake action.

Don’t forget to check out some of the other great sweet potato and honey recipes!


————————————-

I’ve also linked this recipe to Strut Your Stuff Saturdays and The Weekend Potluck!

Categories: Cake and Cupcakes | Tags: , , , , , | 18 Comments

French Vanilla Cappuccino Cupcakes

Not to complain, but it’s been cold and rainy around here the past few days.

This means that I tend to stop at the nearby coffee shop more often these days in search of a warm drink.

Problem is that I don’t drink coffee. I love the aroma of freshly brewed coffee, however I find the taste so bitter and I can’t find the right balance between milk and sugar that I just gave up. Call it child-like tastes, but when it comes to my choice of drinks, I always pick hot chocolate or french vanilla cappuccino ( and just so you know, I am under no pretense that it is anything remotely close to an actual cappuccino).

So when I was trying to think of a cupcake to make on the weekend, all I could think of was a warm and creamy french vanilla.

French Vanilla Cappuccino Cupcakes

I amped up the vanilla in these cupcakes so that it wouldn’t be overpowered by the addition of espresso powder, and then topped them off with a super creamy and lightly sweet  vanilla frosting.

makes 18 cupcakes

  • 1/2 cup butter
  • 1 cup sugar
  • 2 eggs
  • 1 tbsp vanilla
  • 1/2 tsp instant espresso powder
  • 1 1/2 cups flour
  • 1 3/4 tsp baking powder
  • 1/2 cup buttermilk
  1. Preheat your oven to 325°F . Line your muffin pans with liners and set aside
  2. In a large bowl, beat together the butter and sugar together until light and fluff, about 3  minutes. Add the eggs one at a time, beating well after each. Stir in the vanilla.
  3. In a small bowl, combine espresso powder, flour and baking powder. Add the flour to the butter mixture in three parts, alternating with the buttermilk. Beat until smooth.
  4. Fill each of the liners about 2/3 of the way full and pop into the oven for 15-18 minutes, or until a toothpick comes out clean.
  5. Let cool completely, then top with Light and Fluffy Vanilla Frosting (below).

Light and Fluffy Vanilla Frosting

adapted from Epicurious

  • 1 cup milk ( I used 2%)
  • 1/4 cup flour
  • 2 tsp vanilla extract
  • 1 cup butter, softened
  • 1 1/2 cups powdered sugar
  1. In a small saucepan, combine 1/4 cup of the milk and the flour, whisking until smooth.
  2. Set over medium heat, and slowly add the remaining milk, stirring constantly.  Continue to cook until thickened. You want it to be about as thick as custard. Remove from the heat and add the vanilla, continuing to stir for another couple minutes. Set aside and cool to room temperature.
  3. Meanwhile, beat together the butter and the icing sugar until light and fluffy, about 5 minutes. Slowly pour in the milk mixture and continue to beat for a couple minutes, or until light and fluffy. I switched to the whisk attachment to get it extra fluffy, but you don’t have to.
  4. Store any leftover frosting in the refrigerator.

My brother’s fiance H said these were here favourite cupcakes I’ve made yet!

– Mel

————————————-

I linked this recipe to Strut Your Stuff Saturdays and:

Categories: Cake and Cupcakes | Tags: , , | 8 Comments

Marbled Chocolate Orange Pound Cake

I have a confession to make.

I bought a Christmas decoration last weekend. Actually, that’s not entirely true. I’ve already bought three, but the first two don’t count.  I buy them early every year.

Point is, it is barely October, hardly past Thanksgiving, and I have succumbed and bought something related to Christmas. It’s scary I know.

This also means that I should also have my Christmas baking list ready to go, and it’s so totally not. I have no idea what I want to make or what I am going to make. Now normally this is not a big deal, except that I bake soooo much that I am actually starting to panic.

Yes. I have issues.

So, instead of focusing on the nest big holiday that is  far away, I baked something festive for Halloween.

That ended up tasting like those whack and unwrap oranges you get a Christmas time. Go figure.

Marbled Chocolate and Orange Pound Cake

makes one 9×3 cake

  • 1/4 cup milk
  • 3 eggs
  • 1 1/2 cups flour
  • 1 tsp baking powder
  • 3/4 cups sugar
  • 3/4 cups butter
  • 1/4 cup cocoa powder
  • 1 tsp orange extract
  • orange food colouring ( optional)
  1. Preheat the oven to 350°F. Grease a 9×3 loaf pan and line with parchment paper so that it hangs over the sides.
  2. In a bowl, combine the milk and eggs, beating together. Set aside.
  3. In the bowl of your mixer ( or in a large bowl) combine the flour, baking powder and sugar. Give it a whir to combine, then slowly beat in the butter. When it is combined, pour in about half of the egg mixture. When it is combined, scrape the batter from the sides and bottom of the bowl. Slowly pour in the remaining egg mixture and beat until smooth.
  4. Divide the batter into two bowls. In one half of the batter, mix in the cocoa powder. In the other half, stir in the orange extract and the food colouring, if using.
  5. Drop spoonfuls of batter  into the prepared pan, alternating chocolate with orange batter. Swirl the batter together gently with a knife.
  6. Bake for 50-60 minutes, or until a toothpick comes out clean. Let cool for 10 minutes in the pan, then lift out of the pan and let cool completely on a wire rack

– Mel

———————————————————–

I linked this recipe to Strut Your Stuff Saturdays as well as these other great blogs:

Love Bakes Good Cakes


Categories: Cake and Cupcakes | Tags: , , , , , | 7 Comments

Tomato Soup Cake

Wait, wait, wait!

I swear I’m not crazy. Just bear with me  a little bit. It’s good I swear.

Honestly, if I didn’t just tell you I made a cake out of a can of tomato soup, you never would have guessed it. But you see, I’m all about honesty here. And it’s way to good not to share.

I have been  making this cake forever. I do believe it was the first cake I ever made from scratch, out of a cookbook I had been given for Christmas one year. And me, being the rotten child that I was, developed a certain smugness ( that only an 11 year old can) when it came to this cake:

Here try a piece of this delicious cake. What’s in it you say? Oh, you’ll never guess in a million years! You give up you say? Welllll….. TOMATO SOUP!

You know? Like it was boogers or slime or something equally as gross going into this cake. (Which by the way, didn’t)

And honestly, that’s how you got people to eat it. I brought it to  a church potluck one time, and my sister ( in her excitement and unfortunate attempt at shock and awe) went around telling the entire congregation that I had made tomato soup cake. That poor cake did not get touched

Many months later, I made it again, swore my siblings to secrecy in a way that only an older sibling can, and brought it to the pot luck. When people asked what kind of cake it was , I simply said a spice cake, and boy did it fly. 😉

Although I don’t remember this, Mom had to go through the same thing with us, trying to convince her very picky family to try it out, ensuring us that no, it did not taste like tomato soup, that yes it was actually good, and no, she was not lying to us. And she really was right ( although she had prior information because it used to be a cake that her mom would make all the time).

So, what I’m saying is that tomato soup in cake is good and tasty thing. Especially when you want a comforting and spicy cake, that’s slathered in cream cheese icing.

Tomato Soup Cake with Cream Cheese Frosting: 

makes one 9×9 cake. Adapted from Company’s Coming: Kids Cooking  circa 1996

For the Cake:

  • 1/2 cup butter, softened
  • 1 cup sugar
  • 1 egg
  • 1 tsp vanilla
  • 1 can ( 10 oz) condensed tomato soup, undiluted
  • 2 cups flour
  • 1 tsp baking powder
  • 1 tsp cinnamon
  • 1/2 tsp nutmeg
  • 1/4 tsp salt

For the Cream Cheese Icing:

  • 1 pkg ( 8 oz) cream cheese, softened
  • 1/4 cup butter, softened
  • 2 1/2 – 3 cups icing sugar, sifted
  • 1 tsp lemon zest
  1. Preheat your oven to 350 °F. Grease and flour a 9×9 square cake pan.
  2. In a bowl, combine the flour, baking powder, spices and  salt and set aside.
  3. In large bowl or the bowl of your mixer, beat together your butter and sugar until light and fluffy. Beat in the egg and vanilla. Dump in the can of tomato soup and mix until it’s combined with the butter mixture.
  4. Pour in the flour mixture, stirring slowly, until it is smooth and all combined, being sure to scrape the bottom and the sides of the bowl.
  5. Pour the batter into your prepared pan and bake for about 35 minutes, or until a tooth pick comes out clean. Let cool in the pan for about 10 minutes, then remove from the pan and let cool on a wire rack completely.
  6. Meanwhile, in another bowl, beat together the cream cheese and the butter until smooth and combined.
  7. Gradually add the icing sugar to the butter mixture, beating until smooth and creamy. Stir in the grated lemon zest, then spread onto your completely cooled cake. If you find the icing a bit thin, then just stick it in the refrigerator for a bit until it firms up a bit.

– Mel

—————————-

I linked this recipe up to The Weekend Potluck, Strut Your Stuff Saturdays, and On the Menu Mondays! Click the links to check out more great recipes!

Love Bakes Good Cakes
Categories: Cake and Cupcakes | Tags: , , , , | 10 Comments

Coffee Cake Muffins

So calling this a muffin might be a stretch.

But if you can have donut muffins, then I think that coffee cake muffins are reasonable.  Really, it’s just an excuse to eat cake for breakfast. ( as if you need an excuse to eat cake for breakfast, pfft.)

I have long loved coffee cake and love to make them. However it was not until I moved in with Mr Ginge that I realized that maybe not everyone shared my opinion. Mr Ginge is not a picky eater by any stretch of the imagination, but does not like to be surprised with his food. One day, I tried out a recipe for a blueberry coffee cake that looked absolutely delicious, and had told him that there was coffee cake for dessert.

Now this was all fine and dandy, until I placed a slice in front of him, in all it’s blueberry glory. Turns out he was expecting coffee cake. As in coffee flavoured cake. You could feel his disappointment a mile away.

So, as an ode to his dessert dissatisfaction, I made coffee flavoured coffee cake, and because everything is better in smaller, I made them into muffins.

Now despite what seems like a lot of sugar, they aren’t super sweet which makes them great for a breakfast treat or if you don’t want something super sweet after dinner.

Coffee Cake Muffins

makes 12 muffins/ cupcakes

For the cake:

  • 1/2 cup butter, softened
  • 1 cup sugar
  • 2 eggs
  • 2 tsp vanilla
  • 1 1/2 cup flour
  • 1 tsp baking powder
  • 1/4 tsp salt
  • 1 cup sour cream

For the filling:

  • 1/2 cup brown sugar
  • 1 tsp instant espresso powder

For the streusel topping:

  • 2 tbsp cold butter
  • 4 tsbp flour
  • 4 tbsp sugar
  • 1/2 tsp instant espresso powder
  1. Preheat the oven to 350° F. Line your muffin pan with 12 liners.
  2. For the filling: In a small bowl, stir together the brown sugar and the espresso powder. Set aside.
  3. For the topping: In another bowl, cut the butter into the flour and sugar, mixing into your get coarse crumbs.
  4. For the cake: In a large bowl, cream together your butter and sugar until light and fluffy. Beat in the eggs, one at a time, mixing well after each. Mix in the vanilla.
  5. In a another bowl, whisk together the flour, baking powder and salt. Mix it gradually into the wet mixture, alternating with the sour cream.
  6. Fill each liner about 1/3 of thee way with batter. Evenly sprinkle the brown sugar filling over the batter. Top with the remaining batter. Sprinkle the topping evenly over all of the cupcakes.
  7. Bake for 15 – 20 minutes. I mine after 15, and went from there.
  8. Let cool for a couple minutes in the pan, then transfer to a wire rack and cool completely.

Even the kitties wanted to get in on these!

-Mel

————————————-

I linked this recipe up to the Weekend Potluck and Strut Your Stuff Saturdays! Click the link to check out more great recipes!

Categories: Cake and Cupcakes | Tags: , | 4 Comments

Create a free website or blog at WordPress.com.